GitHub Workflow
Basics
The source code of the ESMValTool is hosted on GitHub. The following description gives an overview of the typical workflow and usage for implementing new diagnostics or technical changes into the ESMValTool. For general information on Git, see e.g. the online documentation at https://www.git-scm.com/doc.
There are two ESMValTool GitHub repositories available:
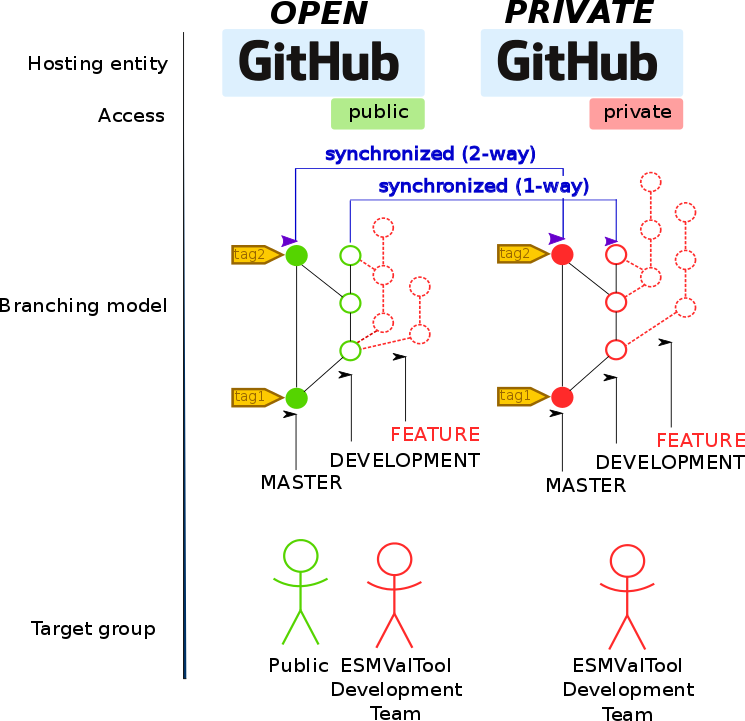
The PUBLIC GitHub repository is open to the public. The ESMValTool is released as open-source software under the Apache License 2.0. Use of the software constitutes acceptance of this license and terms. The PUBLIC ESMValTool repository is located at https://github.com/ESMValGroup/ESMValTool
The PRIVATE GitHub repository is restricted to the ESMValTool Development Team. This repository is only accessible to ESMValTool developers that have accepted the terms of use for the ESMValTool development environment. The use of the ESMValTool software and access to the private ESMValTool GitHub repository constitutes acceptance of these terms. When you fork or copy this repository, you must ensure that you do not copy the PRIVATE repository into an open domain! The PRIVATE ESMValTool repository for the ESMValTool development team is located at https://github.com/ESMValGroup/ESMValTool-private
All developments can be made in either of the two repositories. The creation of FEATURE BRANCHES (see below), however, is restricted to registered ESMValTool developers in both repositories. We encourage all developers to join the ESMValTool development team. Please contact the ESMValTool Core Development Team if you want to join the ESMValTool development team. The PRIVATE GitHub repository offers a central protected environment for ESMValTool developers who would like to keep their contributions undisclosed (e.g., unpublished scientific work, work in progress by PhD students) while at the same time benefiting from the possibilities of collaborating with other ESMValTool developers and having a backup of their work. FEATURE BRANCHES created in the PRIVATE repository are only visible to the ESMValTool development team but not to the public. The concept of a PRIVATE repository has proven to be very useful to efficiently share code during the development across institutions and projects in a common repository without having the contributions immediately accessible to the public.
Both, the PUBLIC and the PRIVATE repository, contain the following kinds of branches:
MASTER BRANCH (official releases),
DEVELOPMENT BRANCH (includes approved new contributions but version is not yet fully tested),
FEATURE BRANCH (development branches for new features and diagnostics created by developers, the naming convention for FEATURE BRANCHES is <Project>_<myfeature>).
Access rights
Write access to the MASTER and DEVELOPMENT BRANCH in both, the PUBLIC and the PRIVATE GitHub repositories, is restricted to the ESMValTool Core Development Team.
FEATURE BRANCHES in both the PUBLIC and the PRIVATE repository can be created by all members of the ESMValTool development team (i.e. members in the GitHub organization “ESMValGroup”). If needed, branches can be individually write-protected within each repository so that other developers cannot accidently push changes to these branches.
The MASTER BRANCH of the PRIVATE repository will be regularly synchronized with the MASTER BRANCH of the PUBLIC repository (currently by hand). This ensures that they are identical at all times (see schematic in Figure Fig. 155). The recommended workflow for members of the ESMValTool development team is to create additional FEATURE BRANCHES in either the PUBLIC or the PRIVATE repository, see further instructions below.

Fig. 155 Schematic diagram of the ESMValTool GitHub repositories.
Workflow
The following description gives an overview of the typical workflow and usage for implementing new diagnostics or technical changes into the ESMValTool. The description assumes that your local development machine is running a Unix-like operating system. For a general introduction to Git tutorials such as, for instance, https://www.git-scm.com/docs/gittutorial are recommended.
Getting started
First make sure that you have Git installed on your development machine. On shared machines, software is usually installed using the environment modules. Try e.g.
module avail git
if this is the case. You can ask your system administrator for assistance. You can test this with the command:
git --version
In order to properly identify your contributions to the ESMValTool you need to configure your local Git with some personal data. This can be done with the following commands:
git config --global user.name "YOUR NAME"
git config --global user.email "YOUR EMAIL"
Note
For working on GitHub you need to create an account and login to https://github.com/.
Working with the ESMValTool GitHub Repositories
As a member of the ESMValTool development team you can create FEATURE BRANCHES in the PUBLIC as well as in the PRIVATE repository. We encourage all ESMValTool developers to use the following workflow for long-lived developments (>2 weeks).
Login to GitHub.com
On GitHub, go to the website of the ESMValTool repository (https://github.com/ESMValGroup/ESMValTool-private or https://github.com/ESMValGroup/ESMValTool)
Click on the button create FEATURE BRANCH
Select the “DEVELOPMENT” BRANCH and create a new FEATURE BRANCH for the diagnostic/feature you want to implement. Please follow the following naming convention for your new FEATURE BRANCH: <Project>_<myfeature>.
Click the button “Clone or Download” and copy the URL shown there
Open a terminal window and go to the folder where you would like to store your local copy of the ESMValTool source
Type git clone, and paste the URL:
git clone <URL_FROM_CLIPBOARD>
This will clone the ESMValTool repository at GitHub to a local folder. You can now query the status of your local working copy with:
git status
You will see that you are on a branch called master and your local working copy is up to date with the remote repository. With
git branch --all
you can list all available remote and local branches. Now switch to your feature branch by:
git checkout <NAME_OF_YOUR_FEATURE_BRANCH>
You can now start coding. To check your current developments you can use the command
git status
You can add new files and folders that you want to have tracked by Git using:
git add <NEW_FILE|FOLDER>
Commit your tracked changes to your local working copy via:
git commit -m "YOUR COMMIT MESSAGE"
You can inspect your changes with (use man git-log for all options):
git log
To share your work and to have an online backup, push your local development to your FEATURE BRANCH on GitHub:
git push origin <YOUR_FEATURE_BRANCH>
Note
An overview on Git commands and best practices can be found e.g. here: https://zeroturnaround.com/rebellabs/git-commands-and-best-practices-cheat-sheet/
Pull requests
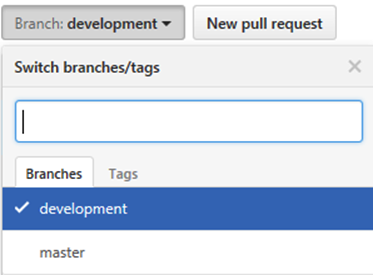
Once your development is completely finished, go to the GitHub website of the ESMValTool repository and switch to your FEATURE BRANCH. You can then initiate a pull request by clicking on the button “New pull request”. Select the DEVELOPMENT BRANCH as “base branch” and click on “Create pull request”. Your pull request will then be tested, discussed and implemented into the DEVELPOMENT BRANCH by the ESMValTool Core Development Team.
Attention
When creating a pull request, please carefully review the requirements and recommendations in CONTRIBUTING.md and try to implement those (see also checklist in the pull request template). It is recommended that you create a draft pull request early in the development process, when it is still possible to implement feedback. Do not wait until shortly before the deadline of the project you are working on. If you are unsure how to implement any of the requirements, please do not hesitate to ask for help in the pull request.
GitHub issues
In case you encounter a bug of if you have a feature request or something similar you can open an issue on the PUBLIC ESMValTool GitHub repository.
General do-s and don’t-s
Do-s
Create a FEATURE BRANCH and use exclusively this branch for developing the ESMValTool. The naming convention for FEATURE BRANCHES is <Project>_<myfeature>.
Comment your code as much as possible and in English.
Use short but self-explanatory variable names (e.g., model_input and reference_input instead of xm and xr).
Consider a modular/functional programming style. This often makes code easier to read and deletes intermediate variables immediately. If possible, separate diagnostic calculations from plotting routines.
Consider reusing or extending existing code. General-purpose code can be found in esmvaltool/diag_scripts/shared/.
Comment all switches and parameters including a list of all possible settings/options in the header section of your code (see also …).
Use templates for recipes (see …) and diagnostics (see …) to help with proper documentation.
Keep your FEATURE BRANCH regularly synchronized with the DEVELOPMENT BRANCH (git merge).
Keep developments / modifications of the ESMValTool framework / backend / basic structure separate from developments of diagnostics by creating different FEATURE BRANCHES for these two kinds of developments. Create FEATURE BRANCHES for changes / modifications of the ESMValTool framework only in the PUBLIC repository.
Don’t-s
Do not use other programming languages than the ones currently supported (Python, R, NCL, Julia). If you are unsure what language to use, Python is probably the best choice, because it has very good libraries available and is supported by a large community. Contact the ESMValTool Core Development Team if you wish to use another language, but remember that only open-source languages are supported by the ESMValTool.
Do not develop without proper version control (see do-s above).
Avoid large (memory, disk space) intermediate results. Delete intermediate files/variables or see modular/functional programming style.
Do not use hard-coded pathnames or filenames.
Do not mix developments / modifications of the ESMValTool framework and developments / modifications of diagnostics in the same FEATURE BRANCH.
